

Moonstruck's European Modifications
Written Spring 2008
Updated August
2008.
Updated November 2009
While we count down the days till our
departure from Barcelona and prepare for the year of cruising ahead, I am
reminded of the worries and tribulations we went through last year, in the
Caribbean as we tried to prepare Moonstruck for Mediterranean cruising.
Several friends are following us across the Atlantic this summer and in response
to their questions I thought it would be a good idea to detail the modifications
we made - not for the Atlantic crossing which are dealt with elsewhere - but
simply to make life easier here in the Mediterranean.- PASSARELLE - GETTING ASHORE
- ELECTRICITY
- PROPANE AND BUTANE (Gas oven and BBQ)
- ALARM SYSTEM
- MOORING TACKLE - Part one
- MOORING TACKLE - Part two
- STERN ANCHOR TACKLE
- THE HUMBLE
FLY-SWATTER!
Overview: After considering the merits of fabricating a passerelle we wound up buying one ready-made in Barcelona for around €600. It was easily installed and is suspended from the same snap shackles we use to hoist the dinghy in the arch.
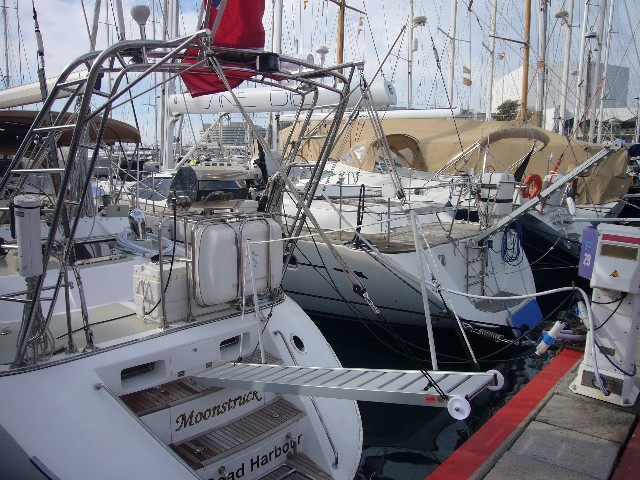
. When stepped on it the pasarelle grounds solidly on the jetty for boarding")
Moonstruck has a perfectly good sugar-scoop stern with steps that has served us well and we initially thought that this would suffice for the typical med-mooring situation where the boat is stern-to the dock secured at the bow by one or two lines installed at the mooring and tailed to the bulkhead. This worked for us in the Marinas of Portugal and Spain but we soon learned in Mallorca, that some bulkheads are way too high for this to be a practical long-term solution. This approach also requires the stern on the boat to be uncomfortably close to the pier - especially in surge or rough conditions.
Looking around the marinas, we found that pretty much every boat over 40' has a passarelle. This nifty piece of equipment is installed at the stern (and sometimes at the bow) and ranges from a simple aluminum ladder, home modified, to fancy hydraulically-powered jobs. The chandlery in Mallorca had several basic passarelles in stock at prices ranging from €750 - €1,100.
At first I was determined to fabricate my own passarelle. I thought it would be pretty simple to buy a cheap aluminum ladder and rivet a suitable length aluminum plate to the rungs to provide a stable enough platform for boarding. I even bought a riveter in Mallorca for the purpose. I then was hit with the reality of our situation. While I am sure that the necessary parts (aluminum rivets, suitable aluminum plate with diamond pattern for antislip, swivel connection and a couple of rollers for the bulkhead end) were available somewhere in Mallorca, my lack of spanish and inability to find the shops selling these parts doomed this effort to failure. I can't over-emphasize how difficult it can be to source and purchase "non-mainstream" parts and accessories. We were in Mallorca - the European capital of sailing and reputed to have the best chandleries in the Med. Yet the chandleries were a far cry from the West Marine's & Defender's that we were used to in the U.S. Equally we found the yellow pages impenetrable as a guide to specialist shops where, for example, aluminum plate might be found. We did eventually find most of the parts in various stores and I estimated the total price at €450 were we to proceed.
By this time however we were in Barcelona and in real need of a Passarelle (Ed: Alan fell in the water boarding after his birthday bash!). The Barcelona boat show was in progress and we were lucky to find a "boat show special" from a local firm.
We purchased a two meter passarelle with a swivel connection to mount at the stern and an additional mounting bracket for the bow (which I have yet to install). The price was €600. When not deployed it is lashed crosswise near the top of the stern arch, out of the way of everything. Alternatively it could be lashed to the stanchions towards the stern. When in service the outboard end is attached to the same blocks that we use to hoist our dinghy, since our dinghy is usually tied off at the bow or on deck when we are using the stern passarelle. A loop of heavy-duty elastic permanently tied to the outboard end of the passarelle allows it to sit above the dock when we are not standing on it, safe from chafe and damage.

Electrickery
Overview: We chose an improvised system to convert the 220v electrical supply in Europe to 110v, using a converted Tool Transformer. Total cost around €550 including all cables and connectors.

We first considered the challenges of operating a 110v 60cycle boat in the European 220v 50cycle environment when we were commissioning Moonstruck. We researched a variety of sophisticated, space-consuming and expensive solutions to the problem. Any one of which would have worked well and might have been an appropriate solution - if we had planned to remain in the Med. However our plan is to return Moonstruck to the USA in a few years for eventual sale stateside, and it seemed a waste to spend so much with little hope of recouping it.
Instead we followed the well-trodden path of purchasing a modified tool-transformer from Mid-Atlantic Yacht Services in the Azores. MAYS always have these in stock and will make up the necessary cables to allow you to plug in to any Med. power supply. The price, with all needed cabling, was around €550. The transformer lives in our aft lazarette which is kept latched slightly open when in port. In the photo the cable runs across the stern gate, a potential tripping hazard. Usually it is run under the passarelle. We have a couple of adaptors so we can connect to 15amp or 30amp dock power outlets as needed.
The advantage of the tool transformer approach is that it fits easily in the stern lazarette (of our Hylas 49); it takes up little space and requires no modifications or installation. Our heavy, stiff bulky 110v cable is safely stowed down below and we are now using lightweight cheap and easy to handle 220v cables on deck.
There are several potential disadvantages to this solution:
It does not convert the cycles from 60 to 50. In our case this is not a problem. All our 110v equipment on board is designed to run on 60 or 50 cycles.
It does not provide enough power to run everything on the boat simultaneously. So for example, we can run one air-conditioner and the water heater, or two air-conditioners simultaneously. But we cannot run two air-conditioners and the water heater. We have not found this to be a major inconvenience. We only use one airconditioner when its just the two of us on board, and the water heater only needs to run for an hour or two a day so it is easy to switch loads when more capacity is needed.
If considering this approach, weigh your electrical needs carefully and consult one of the many websites that provide specific information on the pros and cons (SV Sarah is one site, another is SV Whoosh ). Finally note that tool transformers are not designed for long-term operation and we have been told that it in permanent use it is quite likely that the transformer will fail within a few years. So far it has been fine, we only use it when at dock in Europe and we think that our usage is equivalent to the usage it would receive in its designed location (powering tools at a worksite).
The transformer is relatively cheap, comes in a waterproof box with its own circuit overload/thermal protection and is readily available throughout Europe.
If I had this to do over, I would have also installed one 220v outlet inside the boat and would have run it to the shore-power side of the transformer, providing me with an easily accessed 220v supply on board to use with a couple of small Euro 220v appliances that we have acquired. Instead we improvised by twinning the dock connection and run one cable directly onboard which we can use like an extension cord for 220v appliances.
UPDATE Nov 2009: We have been running this system for 30 months now. Our usage has included full-time transformer up-time for 6 months during each winter. So far it has been problem free.
Propane and Butane
Overview: We converted our main supply (which powers the range) and our BBQ from U.S. propane tanks, to Euro butane tanks. Total cost around €60 plus tanks.


Our very expensive aluminum U.S. Propane tanks are now empty and are taking up valuable storage space. After spending much time traipsing around Southern Spain with an empty propane tank in search of fittings and a refilling station, we have finally converted to the ubiquitous "camping" blue butane containers to supply our Range and our BBQ. There are manifest problems with trying to use the U.S. Propane tanks in Europe. The fittings are different and the tanks cannot be filled commercially here. Europe in general does not have refilling stations, instead the usual process is that an empty butane tank is traded for a full one (Like the Rhino exchange Propane program in US Grocery stores).
The conversion was so simple I wish I had done it earlier. We now own 5 small cheap steel butane tanks. 4 of these tanks fit in our propane locker in place of the two original U.S. spec. tanks. The remaining tank is in a dedicated BBQ propane locker. The tanks are not too heavy and having so many makes it easy to refill one or more when convenient. When we use one tank up we can easily trade it for a full one at a local hardware store.
Conversion - Range gas supply
Remove propane regulator from the end of the supply solenoid in Propane Locker. Get a gas plumbing store to make up a male hose barb to fit on the end of your U.S. spec solenoid. This was the hardest job and required about 7 visits to different plumbing/hardware stores and severely stretched my limited Spanish! Attach a butane hose to the new hose barb and the other end to a Euro spec butane regulater. Cost €40 excluding butane tanks.
We could find no suggestions on changing the jets on our Force 10 range to deal with the change in fuel. We spoke to several boatowners who had made the switch to butane without changing the jets and with no adverse effects and we have found that the burners and oven work fine with butane. Butane has a higher caloric value so you will find that it will heat quicker.
Conversion - BBQ
Overview: Our West Marina propane BBQ is in constant use. We can no longer find the US style screw in small propane tanks and the butane 'camping gaz' tanks sold here will not fit. We needed a couple of adaptors to convert our BBQ to euro spec butane. Note: The similar looking Magma name-brand propane BBQs can be adapted once in Europe. Good reason to go with name-brand instead of West Marine!


We have a West Marine 180SS Barbeque mounted on the stern rail. In the US we used the small screw-in camping propane tanks found everywhere in the US and throughout the Caribbean. These are nowhere to be found in Europe. For a while we refilled our "disposable" tanks from our main propane tank using an adapter purchased at Defender U.S., but as we ran low on propane in the main tanks, and the disposables started to rust and leak, a permanent solution was needed. If we had a Brand Name BBQ like a Magma, I think we could have simply switched the US regulator over to a locally available Euro butane regulator. However our West Marine BBQ regulator is welded on as part of the grill and is not removable. Consequently we had to leave it in-situ. In the end I simply connected a (non-regulated) butane tank fitting to our new butane tank and ran the hose to the BBQ where we used a cannibalised US (West Marine) sourced fitting to screw into the BBQ regulator. This fitting is an adapter with a short length of hose (which we did not use) that is intended for converting a propane BBQ from disposable propane tanks to refillable propane tanks. This solution has its limitations. On the "high" setting I think that the fuel flow is too high and the BBQ gets too hot. Also the flexible hose running from the Igloo to the BBQ is not regulated so it is under hi-pressure whenever the tank valve is open. We have strict rules for operating the BBQ. We use Low or Medium heat settings, which provide as much heat as propane did on the high setting; also we ALWAYS close the tank valve after each use. Our igloo makes an effective cheap butane tank holder and since taking the photo I have added retaining straps to hold the tank in place inside the igloo. Cost €20 excluding butane tanks and igloo.
An added bonus is that we now use the same tanks for our cooking Range and the BBQ which will stand us in good stead if one runs out in a remote environment.
Alarm System
It is not appropriate to list details here - you never know who might be reading this! But after a theft-prone winter in Barcelona we decided to install a top quality Alarm System on Moonstruck. It was not cheap, but when measured against the cost of even a single break-in, it seems like cheap insurance. There are a number of marine or marinized systems on the market. If you want further details and are a friend of ours we will provide more information in response to an email.
Mooring Tackle - Part 1 (New 08/08)
Overview: Peace of mind and security for only €300.
As soon as we arrived in Europe we noticed that a number of local boats were using large stainless-steel springs attached to their mooring lines. We did not at first see the need to add these to our growing list of Euro additions, but a year after our arrival and after a few weeks in the Greek Islands we quickly became convinced of their merits. There are few purpose-built marinas in the Greek Islands and we spend a great deal of time moored in old harbours where the swell from the meltemi is untempered by breakwaters. Without springs we lurch forwards and backwards with the swell far more than spring-equipped boats, This strains the set of our bow anchor, strains our stern cleats and chafes our stern lines. Additionally we often have to tie up to old, rusted and abrasive bollards, or our lines have to run across rough concrete piers which quickly saw away at our mooring lines. Chafe guards are a palliative but not a solution.
The best set up is a 2 meter loop of galvanized chain shackled to a heavy-duty stainless-steel spring. One for each stern line. The stern lines can be tied to the spring as in the black mooring line in the photo below, or better yet, can be spliced to the spring with a stainless steel thimble, shown on the white mooring line. We back these lines up with an additional doubled-up line each side which is slack when the spring is extended. Since it is slack it doesn't chafe and it provides us with a safety margin and as they are doubled back to the boat they let us leave in a hurry if we have to without losing all our tackle. Total price of the chain, shackle and spring in Greece €260.
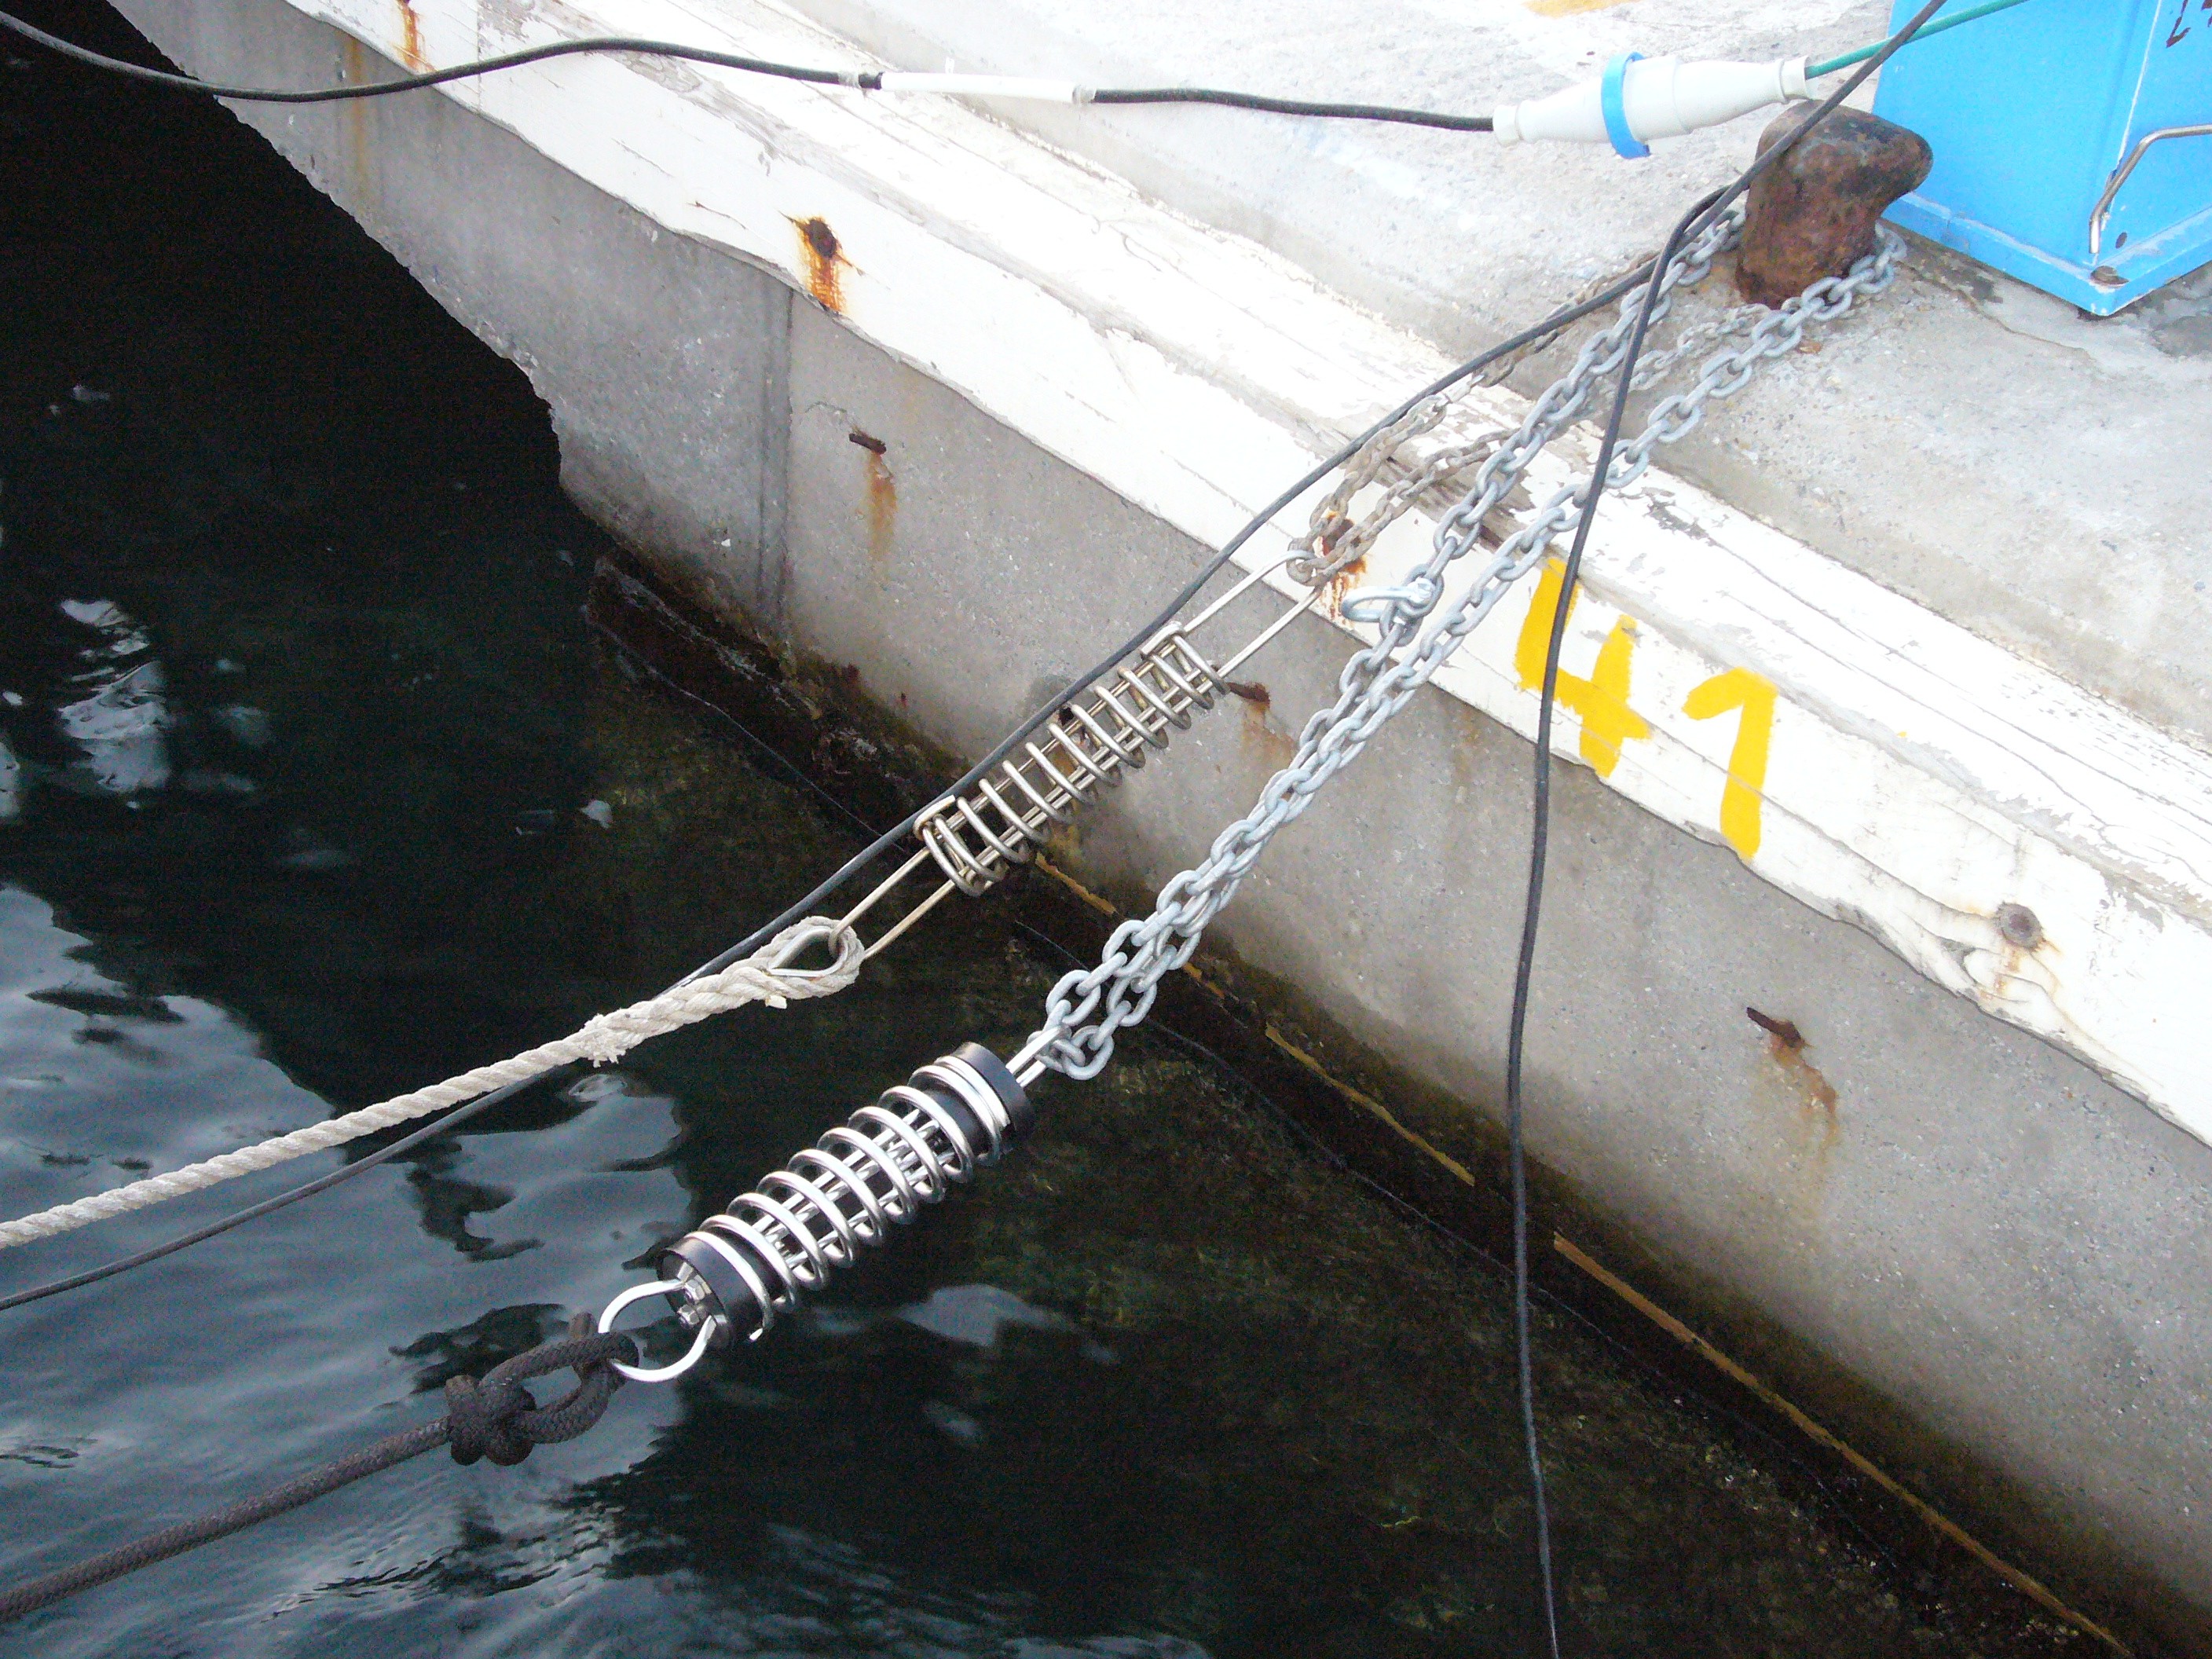
In the picture above the spring attached to the black mooring line is ours. The other spring is a lighter duty unit with no rubber bumper and is securing an adjacent boat. Notice that the mooring line is spliced to the spring on this unit - a better long-term solution.
You could run with stainless steel for the chain, but there is little point. The chain is going to be gouged by the bollards in a variety of mooring situations and corrosion is not an issue between the dissimilar metals as the contact points are open for frequent inspection. Galvanized chain is cheap and if/when it loses its galvanizing it can be cheaply replaced.
Stainless steel is amazingly cheap throughout Greece and we have added to our collection of hardware here. It is much cheaper than in western Europe and even cheaper than the USA.
In summary: It didn't take us too long to realize that we could spend €300 on a complete anti-swell set-up or several thousand euros on stern repairs! The best springs have rubber bumpers built into them and are very heavy duty. They are sold in chandleries throughout Europe. Shackling them to chains allows us to simply throw them over the harbour bollards and eliminate several potential problems at a single stroke.
Note: Springs can break (usually at the end connection to a shackle). Always back-up each spring-equipped line with another (loose) line to the boat, or shackle a loose length of chain to bridge the spring entirely.
Mooring Tackle - Part 2
Overview: Our stern cleats proved to be the weak link in our mooring tackle. We reinforced them in Turkey with a welded top plate and a larger backing plate.
By the time we purchased the mooring springs in Greece (See Mooring Tackle in- Part 1 above), we had given our stern cleats a serious working-out in the surge that is found in some of the Greek harbours in the summer meltemi months. We typically drop an anchor and tie up stern-to in the normal Med Moor arrangement. This creates significantly more tension in the mooring lines than is usual in the typical side-tied arrangement that we usually find in the U.S.A. Essentially it requires creating enough tension in the mooring lines to make the anchor rode bar taut as any slack will allow the stern to get too close to, or hit, the pier. Add surge to this highly stressed mooring arrangement and all the tackle is in for a hard time. By the time we got to our winter berth, it was possible to move the cleats laterally by hand several millimeters! The cleats are robust and are through-bolted with backing plates through two inches of solid fibreglass so my first question was "how did they weaken?" On disassembly I found that the backing plates had been slathered with sikaflex or a similar product on installation. Consequently there was some 'cushion' in the fitting and although the cleat bolts were tight, this cushioning effect allowed a tiny amount of lateral movement in the cleat under severe load. The bottom of the top surface of the cleat is a fairly small diameter sharply angled circle and this small amount of movement eventually allowed the cleat to dig small divots in the deck. Of course as soon as the divots formed, they allowed even more movement and the divots got bigger, exacerbated the problem. When I pulled the cleats out I found that the backing plates had bent so clearly they were too small or too thin.


I had the yard make-up top and bottom plates from 5mm stainless steel. Both top and bottom plates are substantially oversize and provide a huge footprint to act as a stabilizing force. the plates are also twice as thick as the bottom plate previously installed.


The cleats are welded to the top plate and securely throughbolted to the bottom plate, with just a dab of sikaflex to seal the bolt holes.


I believe that the combination of these cleats, and the mooring springs mentioned in Part 1 add up to a bulletproof mooring system.
The bow and midship cleats are subject to substantially less load and have fared very well, there is no movement evident in any of them and I have added a scheduled retensioning of the bolts on all cleats to my maintenance routine.
Total cost of new top and bottom plates, top plate welding and polishing - a very reasonable €150 (in Turkey).
Anchor Tackle (New 10/08)
From everything we had read about Greek and Turkish anchorages we had expected that we would spend a good amount of time tied up "bows-to" to some of the piers and harbours where the water depth close to the pier is not sufficient for our rudder. So before we started cruising this spring we rigged up our 3rd and lightest anchor (an Aluminum Fortress) on the stern rail with a length of chain and 300' of three strand anchor rode.
We had looked everywhere for a reel on which to store the 3 strand, but were not able to find one before we left Barcelona in March, so we flaked the rope in several coils that can be easily stored and deployed.
As it turned out we have used this set up exactly Zero times! In almost every instance where (our outdated) Heikel describes the need to tie up bows-to, we have found ample depth to back-in and tie-up stern to, using our bow anchor out front. On the two occasions where we have found inadequate water depth at the pier. It has still been easier to tie up stern to, leaving the boat out 6 feet or so from the pier, then drop the dinghy in the water and walk across that to get to the pier, rather than deploy an anchor off the stern.
So in a year of cruising these waters we have splashed the Fortress Zero times! We did once wedge it between two blocks of concrete onshore in Mykonos Marina to give us something to moor to in that challenging unfinished marina.
Although the anchor has not been used, we have used the coil of rope. We fitted it with a shorter 6' length of chain and a stainless steel carabiner, and we use it when anchoring in the deep and narrow fjord-like bays. A number of anchorages in both Greece and Turkey have relatively deep water and/or a small anchoring area. It is not possible to put out enough scope without risking hitting the shore, or other boats as the boat swings. So the accepted procedure is to drop the bow anchor, then back towards the shore and secure the stern with a line around a rock or tree on the shoreline. The chain at the shoreside end stops chafe, and is often looped around fiercely sharp rocks that would destroy rope, and even chafe protection, in no time flat, and the clip allows us to accomplish the task quickly. We run the line back through the stern chocks to a primary winch.
The Humble Fly Swatter! (New 10/08)

We picked up two free fly-swatters at the Newport Boat Show several years ago. They remained buried deep in the bowels of the boat during our cruise through the Caribbean. We dug them out in Italy, then gave them a work-out in Greece. Now we are in Turkey. The flies here actually bite and draw blood and there is always a fly-swatter within easy reach.
Strangely we have not noticed fly-swatters for sale in any of the shops here (we haven't really been looking though). So if you are heading to the Eastern Med. pack a few fly-swatters!